
Adding, Editing and Cancelling Instructions
- Adding Instructions
- Editing Instructions
- Cancelling and Rejecting Instructions
- Cancelling Instructions in New Status in Bulk
Adding Instructions
From the Active Instructions Card on an Investor Account, select the “Add Instruction” button.

Select the relevant Instruction Type from the drop-down list.
Note: The Instruction Types that are available in the list, are determined by which ones are made available on the product setup.
<! — Smaller Image –>

Complete the instruction, by entering all the relevant fields:
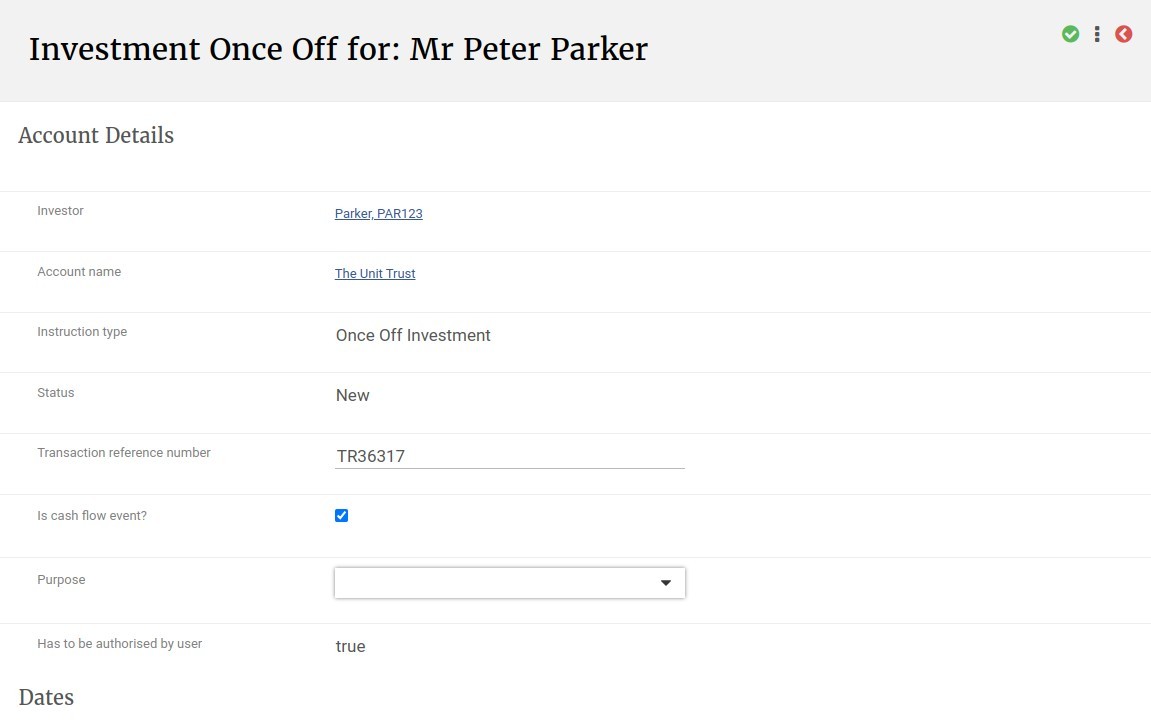


Received via: Select whether the instruction was received from the investor via eMail or Fax
Date and time received: Enter the Date and time that the instruction was received. The current date and time is automatically entered, when the user clicks in this field.
Investor & Portfolio links: If needed, the user can link to the Investor- or Account view from the instruction.
Amount: Enter the amount for this instruction.
Initial platform fee: This fee gets calculated automatically from the Initial platform fee as setup on the Fees per instrument, but can be overwritten by selecting ‘Change’ and entering the relevant exclusive percentage.
Interest: Will be calculated automatically for the period from the date of the matched deposit to the date of the creation of the fund manager instruction (if activated on the Product), but can also be overwritten on the instruction, by ticking the checkbox and entering the interest amount.
Note: If Interest is not overwritten on the instruction, the automatic calculation will be based on the interest rate scale as selected on the product setup.
Initial advisor fee: Will be calculated automatically, based on the percentage setup on the adviser card of the account, else it can also be overwritten for the individual instruction, by selecting ‘Change’ and entering the relevant percentage. If there is an initial advisor fee applicable, the calculated fee amount will be displayed in the Initial advisor fee field.
Commencement date: this date specifically applies to the recurring type of instructions and will default to the first day of the current month.
Method of payment: select the relevant payment method from the drop-down list.
Allow closed to new business instruments?: This field will only be available for users with the relevant permission and if ticked, will then also make available instruments in the “Available funds” list, which are on the “Closed to new business” status.
Available funds: Select the instruments required for the instruction’s allocation from the list and click on the “Add Instrument” link. The list of instruments available in the drop-down, will depend if the instrument is available on:
* the product
* the adviser (if an adviser is linked to the account)
* the brokerage (if an adviser is linked to the account)
* the employer (if the investor is a member within a group)
* the model portfolio (if it is a managed portfolio)
Fund Selection: The instruments that were added from the available funds list, will be listed in the Fund Selection section. Select whether to work in amount or percentage. Enter the relevant split percentages per instrument, which should add up to a total of 100% allocation or the amounts, which should add up to the ‘Amount’ of the instruction, minus initial fees.
Asset Allocation: The asset allocation information will be displayed if properly setup in the system. For more information see Asset Allocations.
Notes: to add notes / comments to the instruction, click on the “Add Note” link at the bottom of the instruction view. A dialogue box will be opened in which text can be entered, then select the “Add Note” and “Done” buttons. The user who added the note will be displayed in the Notes section, along with the date and time stamp of when it was created.

Enter the “Source of Funds” for investment type of instructions. For more information see Source of Funds.
Save, when all the fields for the instruction have been completed. Validation messages will appear if any of the validation rules are not met or required field/s are not completed.
Note: If a user started capturing an instruction and then navigate away from the instruction without saving first, the instruction will be removed by the overnight daily cleanup procedures.
Editing Instructions
An instruction that is in NEW status can still be edited and will be available from the “Active Instructions” section of the account view.
Select the Date link of an instruction to open the detail view of the instruction.

Cancelling and Rejecting Instructions
An instruction that is in NEW status can be CANCELLED and will no longer be displayed in the “Active Instructions” section, as it can not be edited once it is cancelled. A read-only view of the instruction’s details can be opened from the “View Details” view of the instructions.

An instruction that is in SUBMITTED status can be REJECTED and will still be displayed in the “Active Instructions” section, as a rejected instruction which can be edited and submitted again.

Cancelling Instructions in New Status in Bulk
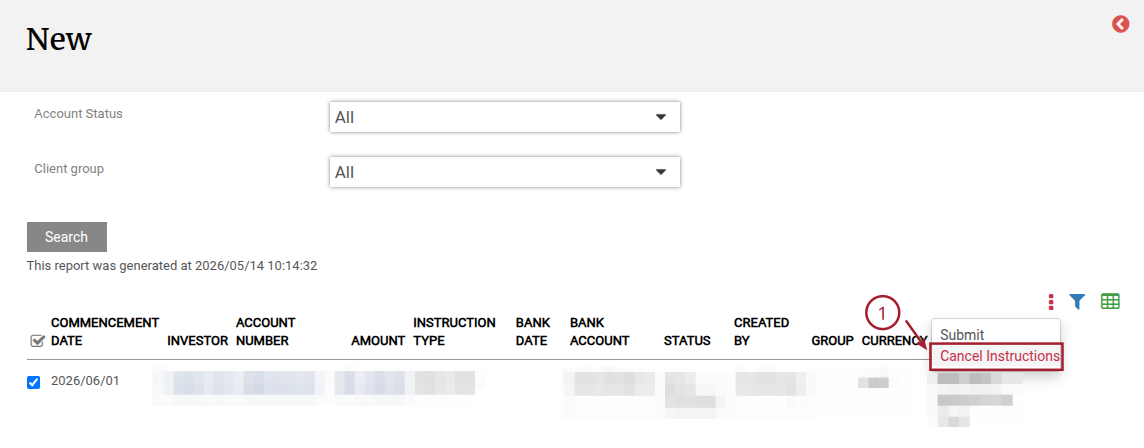
Instructions in status ‘New’ can be cancelled in bulk via the Instructions menu -> New:
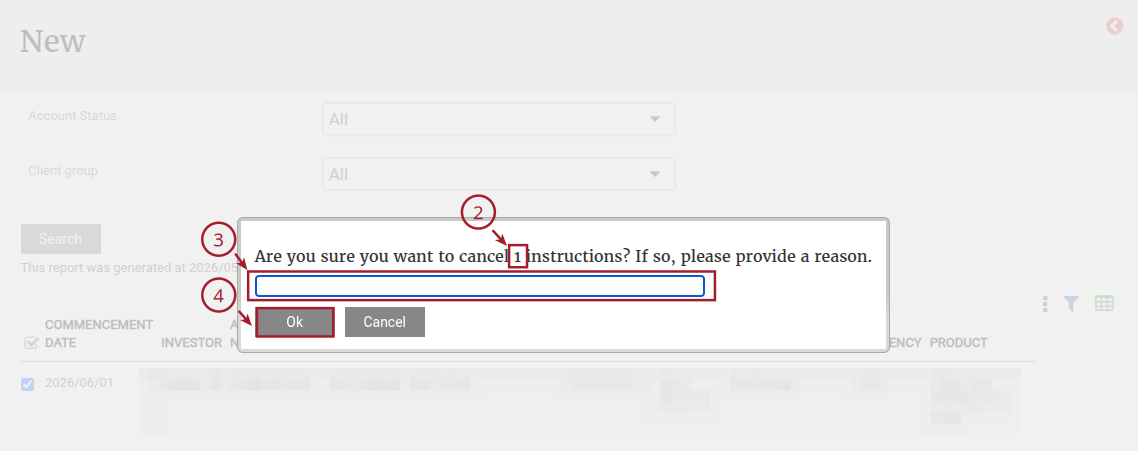
- Select the on-screen menu -> select ‘Cancel Instructions’ menu option -> a pop up message will appear indicating:
- The number of instructions that will be cancelled
- A text field where the reason for bulk cancellation can be inputted
- Select ‘OK’ to proceed or ‘Cancel’ to stop the process
Last Updated on 5 months ago by Hayley Jerram