
New Client Take-On Registration Process
Background
The new client take-on registration functionality allows new investors to self-register, create their investment contract, and submit their once-off or recurring investment instruction as well as make their fund selections by following a guided five-step online process, this can be done without have an existing login or contract. Please contact support@finworks.biz if you would like the invest now link to be made available on your log in page.
- Invest Now screen
- Step 1: Choose your account type to match your investment objective screen
- Step 2: Choose your instruments screen
- Step 3: Fill in your details screen
- Step 4: Check and submit
Invest Now screen
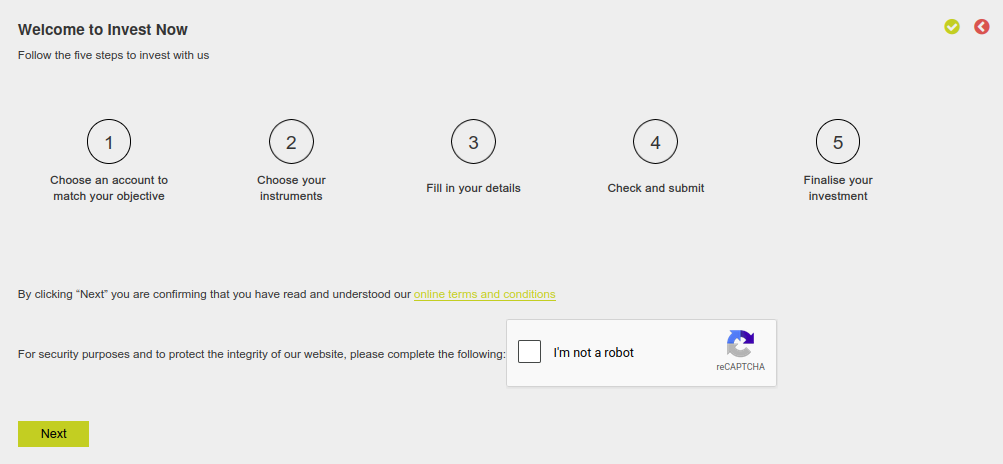
A new investor using the new client take-on process will be directed to the first screen of the process, ‘Welcome to Invest Now’. This screen displays the upcoming five steps in the process and allows the investor to view the online terms and conditions.
- The online terms and conditions can be viewed by selecting the hyperlink.
- Please select the CAPTCHA and wait for the ‘tick’ to appear before selecting the ‘Next’ button to proceed.
Step 1: Choose your account type to match your investment objective screen
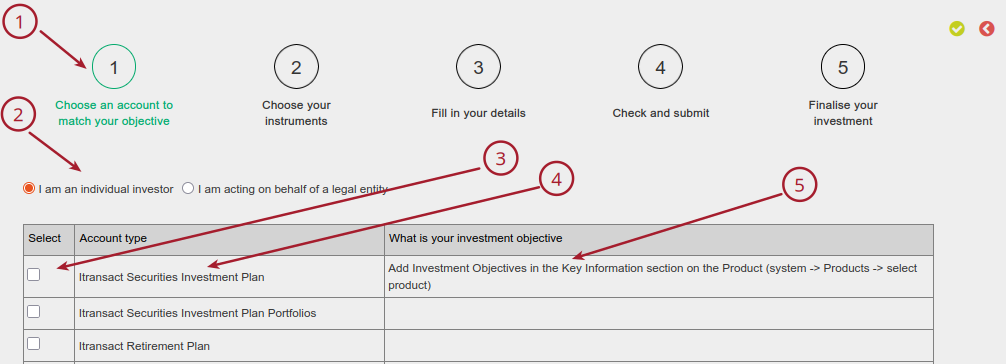
The current step in the Invest Now process is highlighted (1) at the top of each screen as the investor progresses through the process. This stage allows the investor to confirm whether the application is in the name of an individual investor, or a legal entity (2), the appropriate Account type can then be selected using the checkbox (3) next to the corresponding Account type (4). Where Key Information has been completed on the Product’s set up on the system, this will be displayed in the ‘What is your investment objective’ column (5). Please refer to the set up section below for more information on which Account types (Products) are displayed and how to configure the ‘What is your investment objective’ text displayed.
Click the ‘next’ button to proceed, or ‘back button to return to the previous screen.
Set up Required:
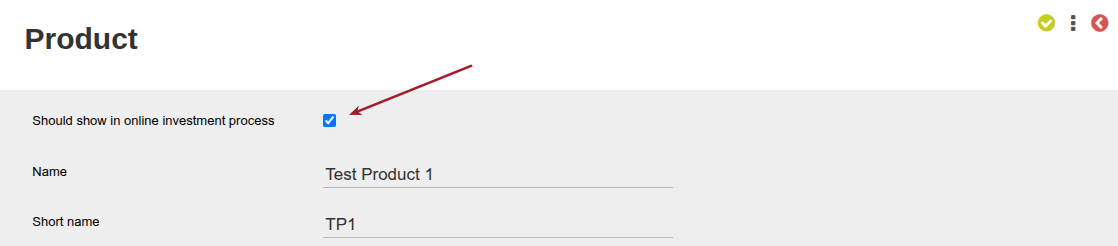
- The display of Products that should be available for selection by the registering investor can be enabled via system -> Products -> select product -> select the checkbox labelled: ‘should show in online investment process’
- The ‘investment objectives’ displayed in the product selection table will populate with the information that is loaded on the system via system -> Products -> select product -> complete investment objects in the ‘Key information’ field
- Note: Multiple sets of information can be added in the Key information list on the product, each item will be displayed one after the other in the ‘what is your investment objective’ column on the ‘Choose an account to match your objective’ screen in the Invest Now process.

Step 2: Choose your instruments screen
The second step allows the investor to select the funds in which they would like to invest in with a once-off lump sum investment and/or a recurring monthly investment.
‘You can choose to invest’ will be followed by a the minimum initial lump sum amount (1) and minimum monthly amount (2) if these Instruction Types and Minimums have been set up on the product.
Select the ‘Add Instrument’ button (3) to select instruments in which to invest.

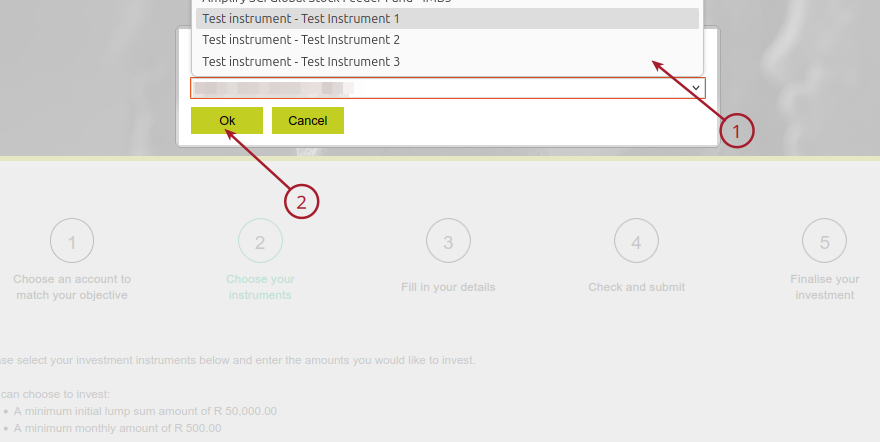
A drop down menu will be displayed from which each investment instrument (1) can be selected before pressing ‘OK’ (2). Only instruments which have been made available to the Product on the system will be displayed.
Each selected instrument will be displayed on the ‘Choose your instruments screen’:
- If a Fund Factsheet has been uploaded for the investment instrument, a symbol will be displayed next to the investment instrument on screen and can be selected in order for the user to download the Fund Factsheet.
- The ‘Lump sum investment’ and ‘Monthly investment’ values can be inputted
- The total ‘Lump sum investment’ and ‘Monthly investment’ values indicate the combined investment amount per instrument in these two categories.
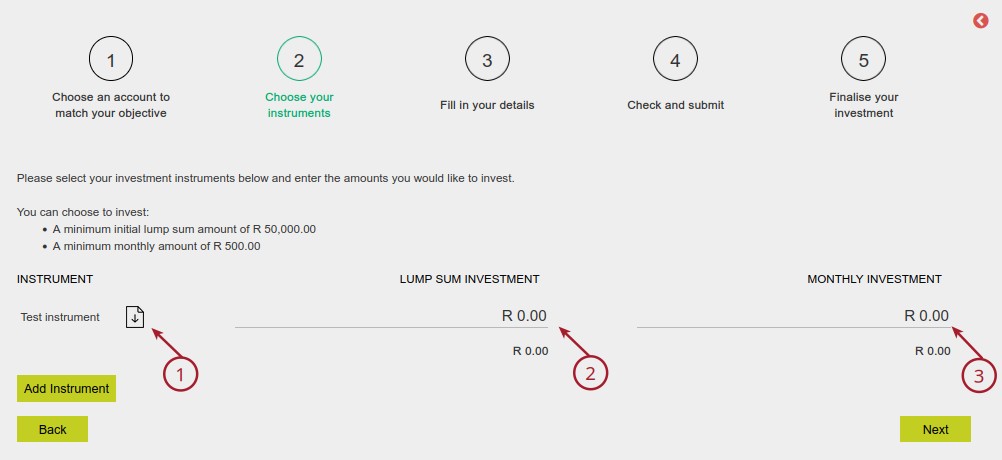
Once the user has inputted the intended investment values per Instruction Type and Investment Instrument, press the ‘next’ button to continue.
Note: if the ‘Lump sum investment’ and/or ‘Monthly investment’ values are below the product’s minimums, a warning will be displayed at the top of the screen indicating the issue/s and the user will not be able to proceed to the next screen until this is resolved.
Set up Required:
For ‘minimum initial lump sum amount’ and ‘minimum monthly amount’ fields to be listed on the screen:
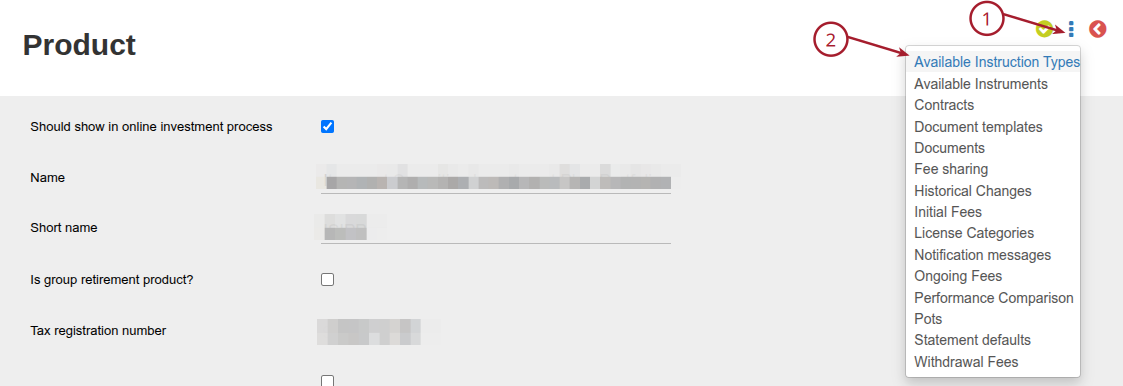
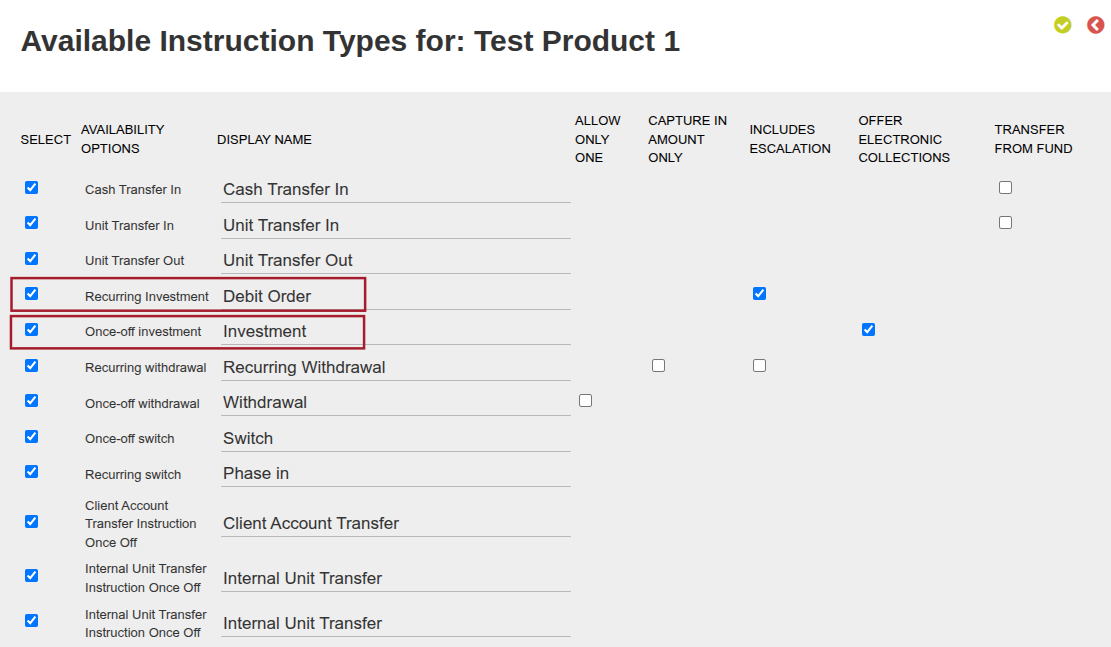
- Minimum initial lump sum amount will be displayed if the Instruction Type ‘Once-off Investment’ is selected on the Product: system -> product -> menu (1) -> Available Instruction types (2) – Screenshot A:
-
-
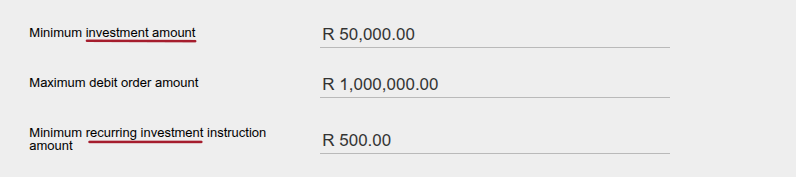
- For minimum values to populate next to Instruction Type on screen: system -> product -> Minimum investment amount – Screenshot B
-
2. Minimum monthly amount will be displayed if the Instruction Type ‘Recurring Investment’ is selected on the Product: system -> product -> menu (1) -> Available Instruction types (2) – screenshot A
-
- For minimum values to populate next to Instruction Type on screen: system -> product -> Minimum recurring investment instruction amount – Screenshot B
Screenshot A
Screenshot B
Investment Instruments available for selection from drop down menu on screen:
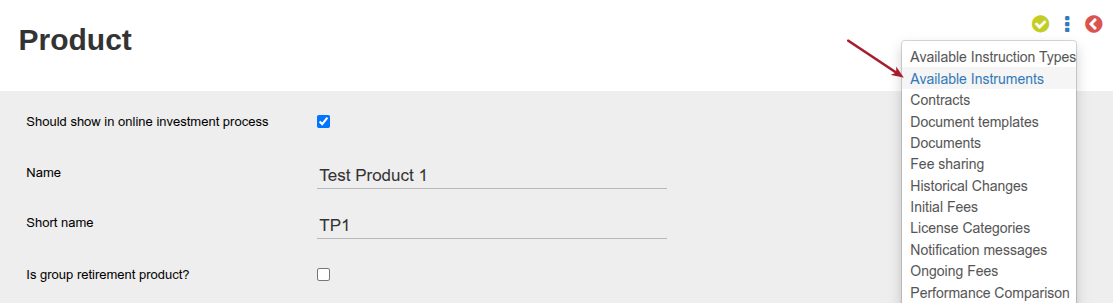
Instruments which are available on the Product will be displayed in the drop down menu on the ‘Choose your instruments’ screen. To edit available instruments on a Product: system -> products -> menu: Available Instruments -> add or remove as required
Display Fund Factsheets for Investment Instruments:
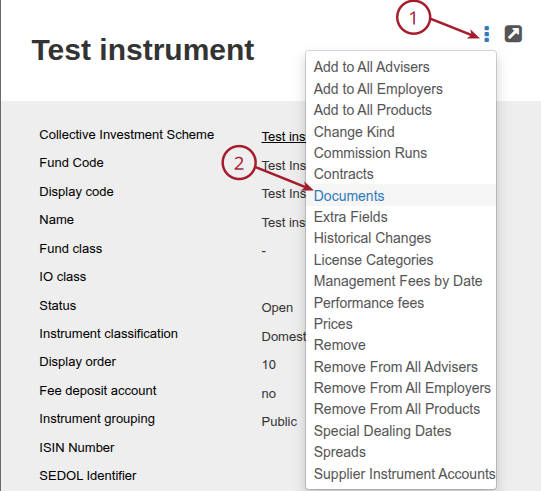
Load the Fund Factsheet on the instrument: search for instrument, or identify in list of instruments via the Instruments main menu -> click on name of instrument -> from Instrument card: menu (1) -> select ‘Documents’ menu option (2) -> select ‘add’ button and complete relevant dates on Document screen (e.g. Type = Fund Fact Sheet, upload document, the label and date can also be edited if necessary here) -> save
Step 3: Fill in your details screen
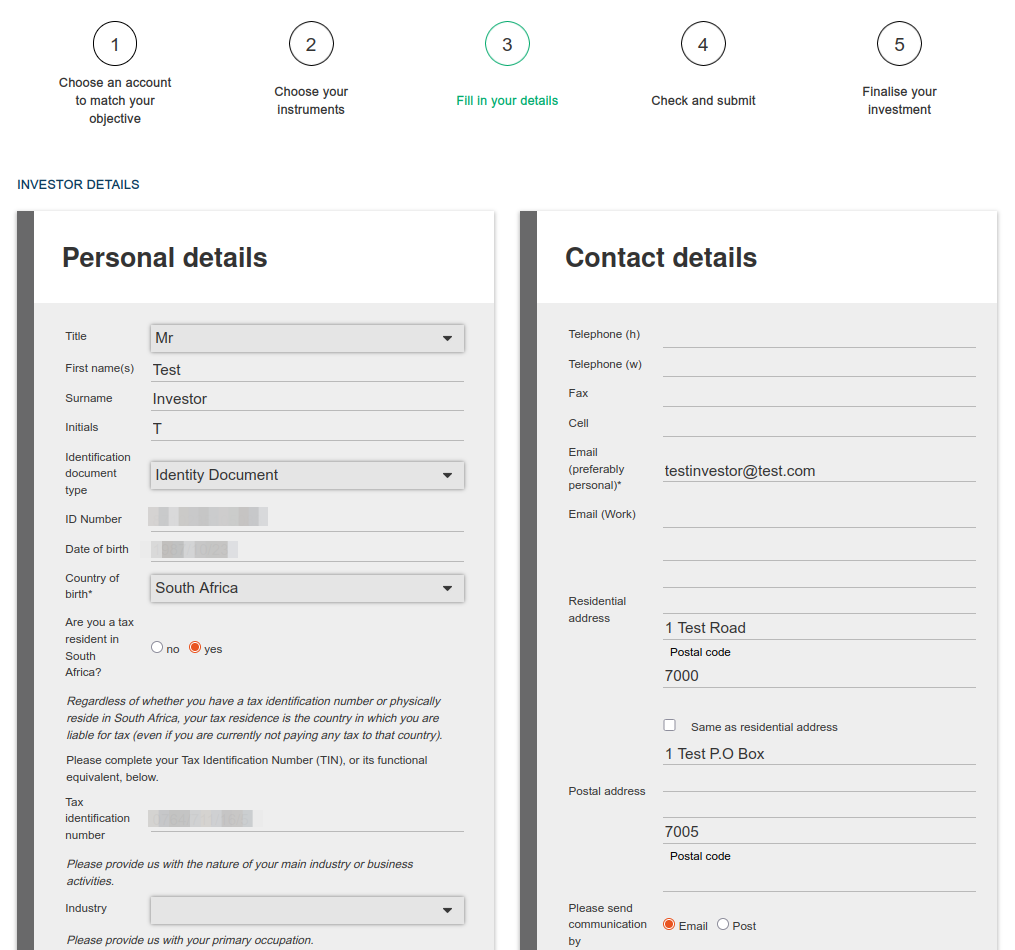
The investor will complete their personal details and receive warnings where validated information is incorrect (ID number, date of birth, tax number) or where required information has been omitted. Once the errors have been resolved, the user will be able to proceed by selecting the ‘Next’ button.
Set up Required:
‘Industry’ and ‘Occupation’ drop down options:
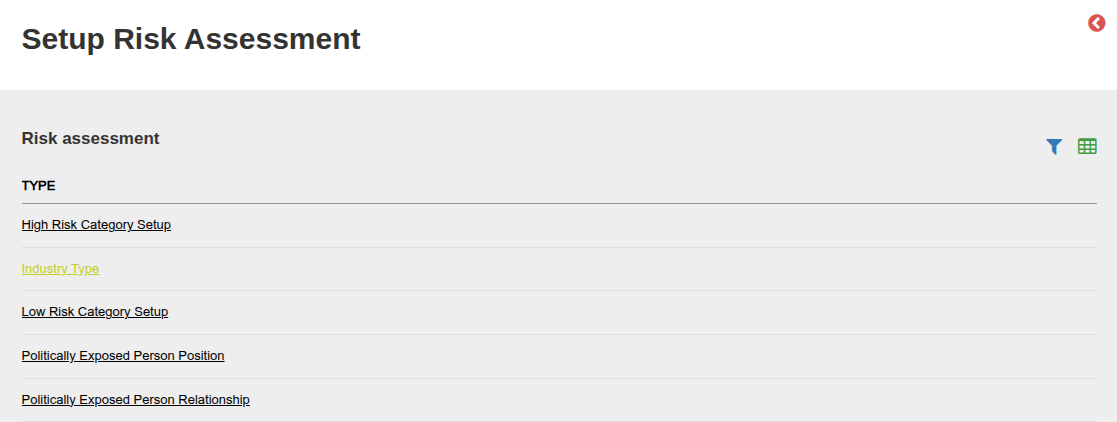
These are displayed according to the categories set up on the system. To create or edit these categories: system -> Risk Assessment Setup -> click into ‘Industry Type’ or ‘Risk Assessment Occupation Type’ -> add relevant categories and save
Step 4: Check and submit
A summary of the information completed including the instrument details table which summarizes the selected instrument/s (1) and the lumpsum investment (2) and monthly investment amounts (3), and investor details (4) will be displayed. The fund factsheet symbol (5) will be displayed next to each instrument where the document has been loaded on the instrument on the system (see setup), the investor can click on the symbol in the instrument details table to review the fund factsheets before proceeding with their application.
The investor is able to select the ‘Back’ button to navigate to any of the prior screens in order to amend their application.
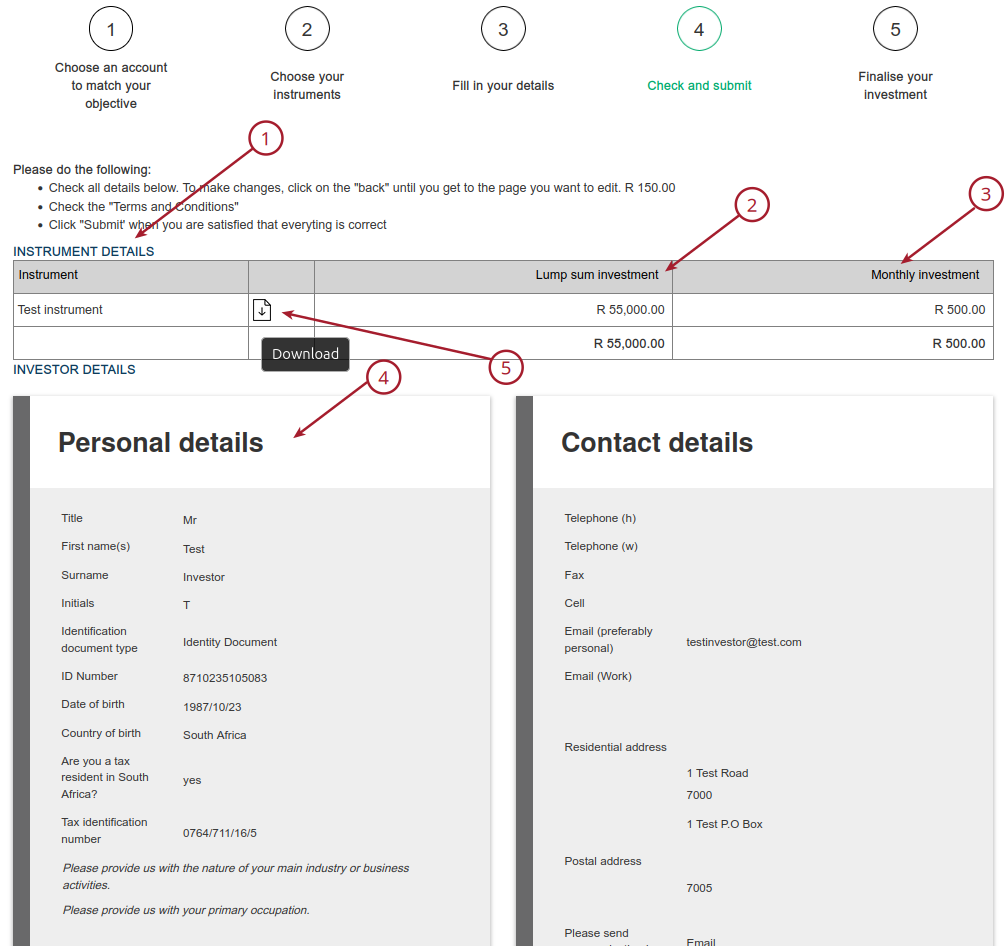
Once the investor is ready to proceed based on the application summary displayed on the ‘Check and Submit’ screen:
- The documentation is accessible from the ‘Check and Submit’ screen:
- Fund Factsheet symbol (where applicable) is displayed next to each investment instrument
- ‘Fund factsheet’, ‘Terms and Conditions’, ‘Investor Declaration, and ‘Online Terms and Conditions’ are hyperlinks and can be selected by the investor in order to access and review these before proceeding.
- The investor is required to select all three checkboxes displayed as confirmation that the Fund Factsheets, Investor Declaration and Terms & Conditions documentation have been reviewed.
- Press the ‘Submit’ button to complete the investor take-on process
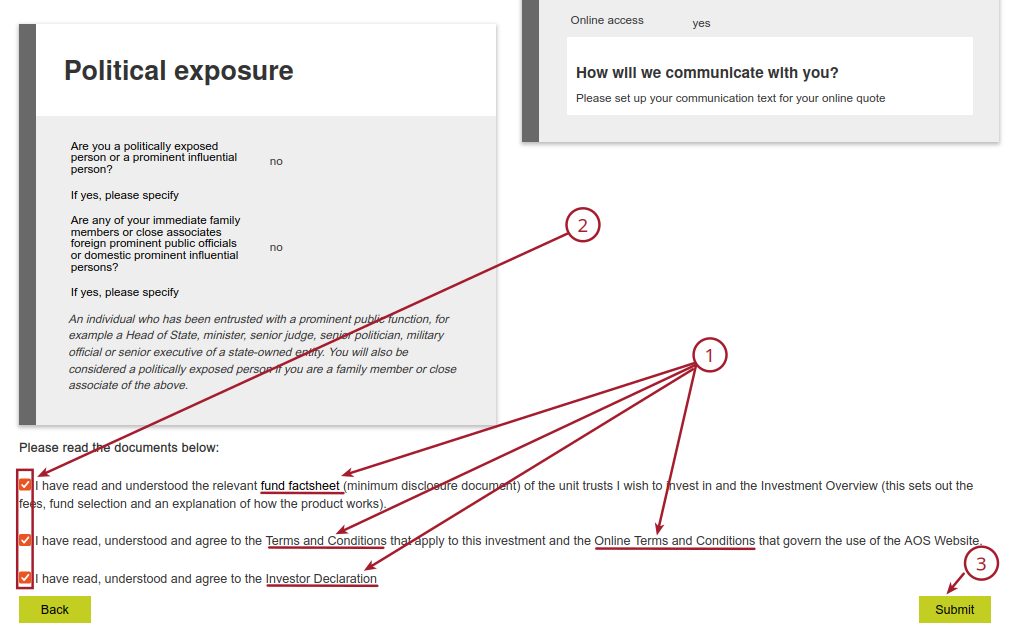
Set up Required:
1. Display Fund Factsheets for Investment Instruments
2. Display ‘Terms and Conditions’ as a hyperlink to document:
-
- System -> Documents -> select ‘Add’ symbol -> Document Type: Terms and Conditions
- System -> Products -> select Product -> upload terms and conditions documentation via the ‘upload’ button displayed next to the ‘Overview and online application Terms’ field
3. Display ‘Investor Declaration’ as a hyperlink to document:
System -> Documents -> select ‘Add’ symbol -> Document Type: Investor Declaration -> upload document
4. ‘Please set up your communication text for your online quote’:
System -> Products -> select Product -> menu: Document templates -> select ‘online employer quote template’ -> select ‘communications template’ -> edit wording as required -> save
Last Updated on 3 months ago by Hayley Jerram