
Commission
Why does the system not take adviser fees?
For compliance with regulations the system does not take fees on an investment account, if the adviser linked to the investment account does not have the instrument that is on the investment account in his “Available Instrument” list.
Available instrument list on the adviser translates into “Does the adviser have a license to sell the instrument”. If ANY instrument on the client account is not in the adviser list, then the whole account will be skipped in the fee run, pending the outcome of some Regulatory investigation or suspension of the adviser.
If an instrument is closed for investments you can leave the instrument on the adviser, but just make it Inactive – Closed. This will prevent it from appearing in the list of funds to invest in when you create an instruction.
Under Reports -> Compliance report -> there is a list of Investor accounts that has Compliance problems. Before you do a fee run with commission you need to check this report.
There are a couple or reasons you DON’T want to add an instrument to an adviser:
1. Compliance – the adviser is not licensed to sell the instrument e.g If you look on the FSB site under FAIS and search for Adviser XYZ. Under Products Approved you’ll see they are not registered to sell “Securities and Instruments: Shares”. So lets assume you need this license. You should NOT link an instrument like a PSP’s to him. This will prevent you from accidentally selecting a PSP for a client.
Same with the tick “License” under the product section of the adviser. If he cannot sell a Living Annuity you should not tick this. When you then click Add investment on the client and he is linked to an Adviser without the license, the Living Annuity will not show as an option.
2. Business rules – You might not want the Advisers XYZ to be able to sell e.g. etfSA funds, not because they cannot, but because these are specifically reserved for other advisers as part of your business arrangement. Then don’t add the etfSA instrument to the other advisers. i.e specific adviser established funds.
3. Check if the Adviser is licensed for the relevant product.
4. Check if there is an end date specified for adviser, before the date specified as the taken up to date on the fee run (Adviser Card on the investor account ->Annual advisor fee end date).
Emails
How do I test emails/sms from the Test site?
To prevent emails/sms being sent to actual email addresses or phone numbers of investors, advisors or employers from the Test site, a security measure was implemented that by default, NO emails/sms will be sent to the actual recipients from the Test site. There is an override that you can populate, so that all emails from the test environment are sent to this email/list of email addresses.
On Production you can maintain this override email list called Override ALL test emails to. This field is maintained by the clients themselves and when a restore is done from production to test, then the test environment will have this override as it was updated on production. Note that you can also change it on test if you’d like for a specific test case, but this will not be saved or remembered following a deployment/restore. The test environment will always revert back to what is populated on production following each deployment/restore.
On the Test environment you can maintain the Override ALL sms to field, this is not maintainable on production.
1. Select System -> Configuration
2. Complete the “Override ALL test emails to” field and/or the “Override ALL sms to” field with the relevant email address or phone number and save.
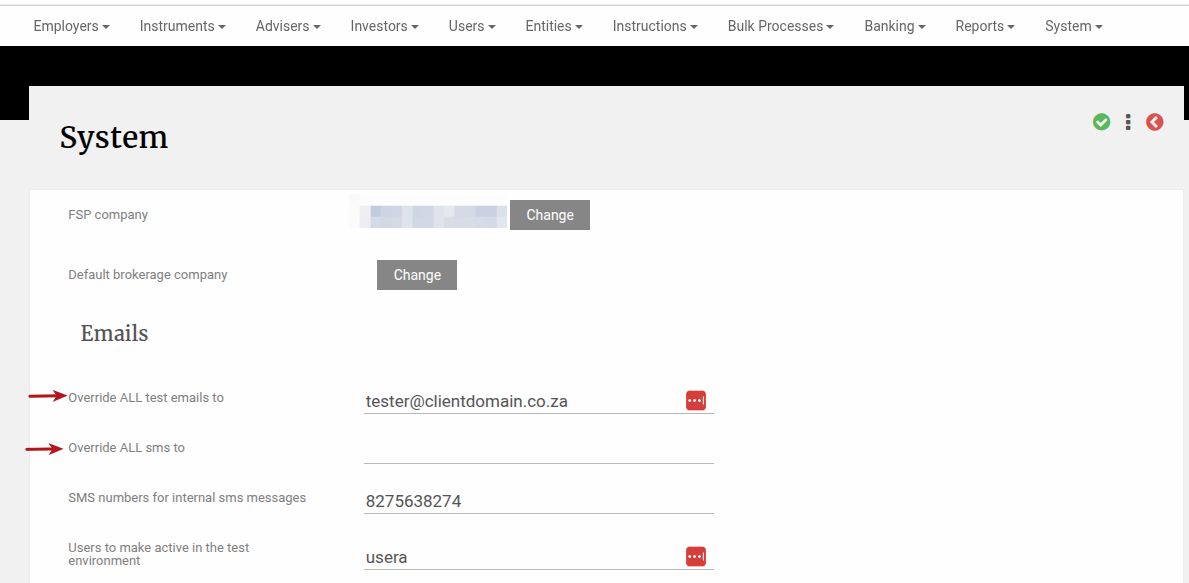
Once the email/sms override is activated, all the system emails/sms will be directed to the specified email address/phone number. The actual email address/phone number that it would have been sent to, can be seen in the email log (System -> Emails) or the sms log (System -> SMS).
Can more than one e-mail address be added to an email field?
Yes, simply separate the email addresses with a comma (,)
NOTE: If a semicolon (;) is used the system will give an error: “Invalid email address“
Exports
Why change the export format from comma delimited (.csv) to tab delimited (.tsv)
Why
The Download / Export format file type has changed from comma delimited (.csv) to tab delimited (.tsv). This was done to be more compliant on the various platforms that our clients are using and also to accommodate special characters i.e. ö, (changed from UTF-8 to UTF-16 encoding).
As tab delimited (.tsv) file does not usually have a default program (i.e. Microsoft Excel), associated with the .tsv file extension, users have to associate the file type accordingly. If done correctly this process should only be performed once.
Download
Download the required information by selecting the green Download  icon
icon
Save the file on the preferred location and navigate to that location
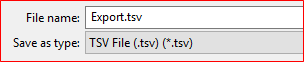
If the .tsv file type has not been associated with i.e. Microsoft Excel it would look something similar to this:

Associate
To associate the .tsv file extension with Microsoft Excel, right click on the Export.tsv file (as shown above), and select Open With

You will be prompted with:
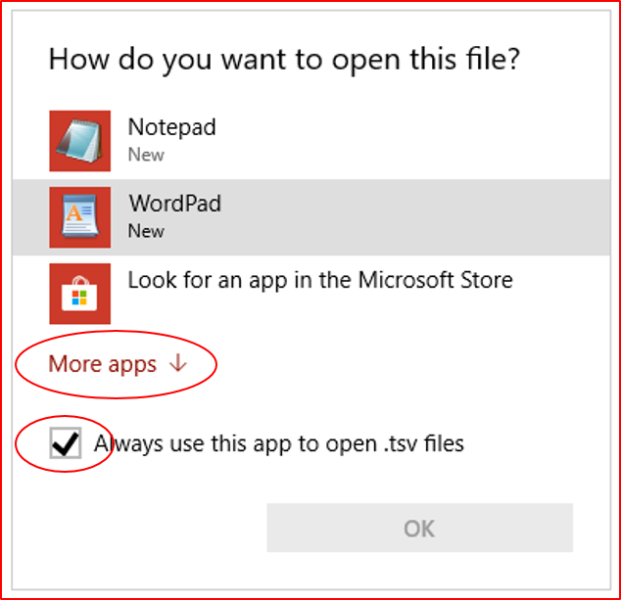
NOTE: Ensure that the check box “Always use this app to open .tsv files” has been selected, if not you will have to repeat the process.
If Microsoft Excel is one of the options select Excel, click on OK and your done. If not select “More apps”
Scroll through the list, if Microsoft Excel is one of these options select Excel, click on OK and your done. If still not on the list select “Look for another app on this PC”
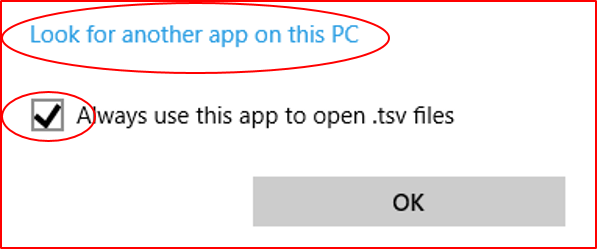
Navigate to the location where Microsoft Excel has been installed and select Microsoft Excel

Usually Microsoft Excel is installed in “Program Files\Microsoft Office\Officexx” where the xx indicate the version of Microsoft
Select Microsoft Excel and your done.
Next Time
The next time you Download a .tsv it should be already associated

NOTE: The import file format has not changed
How to extract values from a column that contains currency symbols
1.Open the file using Character set UTF-8 (see setting UTF-8)
2.In the next empty column (in the example column C):
2.1. set the header to, e. g. ‘Value’
2.2. set the formula for each row to =MID(B2,3, LEN(B2)), where B is the column that contains the value to be extracted

Drag the formula down the column(C) for all rows in the file


3.In the next empty column (in the example column D):
2.1. set the header to, e. g. ‘ValueNumeric’
2.2. set the formula for each row to =VALUE(C2), where C is the column that was extracted

Drag the formula down the column(C) for all rows in the file


The Values in Column D are now numerical and calculations can be performed on them.
The currency symbols does not display right when I open a csv export in excel
If your currencies look like this when you open the csv file, excel is set to use a character set that is not UTF-8

Don’t just open the file by double clicking on it, which would open it by default in Excel, but bypassing the Import Wizard.
Don’t open the file from the Download shortcut options, which appear at the bottom of the screen, after downloading a file.
Here is how to open your csv file via the Import Wizard, so that you can change the Character set to UTF-8:
First open Excel (as a blank document) and then from the Data Tab, select ‘From Text’ and browse to the file to be imported. On selecting ‘Import’ the Import Wizard will be initiated.

From the Import Wizard on Step 1, select ‘UTF-8’ from the dropdown next to ‘File origin’, ensure the ‘Delimited’ option is selected and click Next.

On Step 2, select the option for Comma delimited and click Next.

On step 3, select ‘Finish’.

And now the currencies display correct!

Fee Runs
What are the reasons for listing an investor on the Compliance Report?
1. Ongoing fees are zero for the fee run period.
2. Adviser and / or Brokerage not licensed for one or more instruments (not made available).
Imports
How to include foreign language characters in a .csv import file
Foreign language characters work better with UTF16 encoding.
To prepare .csv files for import users would start with a blank file or an existing export.
If you start with a blank sheet input the foreign characters in the sheet and continue to save as explained below.
If you are opening an existing export file, the foreign characters in the file would have to be corrected before saving. For instance é would display as íš and would have to be corrected.
Excel (Tested in Mac Microsoft Excel ver 14.7.7)
- Open the file in Excel
- Modify the foreign text to the correct format
- Click File>>Save As
- Under Format select UTF-16 Unicode Text (.txt)
- Click Save
- Import the file
Note: if you open this file as-is with Excel, the file will open correctly with the characters displaying correctly. The file is saved with a .txt extension, and has tabs as separators (Microsoft standard functionality)
Excel (Tested in Windows Microsoft Excel 2007)
- Open the file in Excel
- Click File > Save As
- Click the dropdown menu beside Save as File Type and make sure CSV (comma-delimited) is selected
- Click the Tools button at the bottom of the window and choose Web Options
- Go to the Encoding tab
- Under Save this document as, click the dropdown menu and choose Unicode (UTF-8)
OpenOffice (Tested in ver 4.1.5)
- Open the file. If it asks which Character set, then select Western Europe (ISO-8859-16/EURO), using Tab and Comma as separators.
- Modify the foreign text to the correct format
- Click File>>Save As
- Under File type: select Text CSV (.csv)
- Click on checkbox Edit filter settings
- Click Save
- Under ‘Export Text File’ dialog change Character set to Unicode (UTF-16)
- Under ‘Export Text File’ dialog change Field delimiter to {Tab}. (If this is not done, the file will not open correctly in Excel; excel uses Tab as separator for UTF16 files as a standard)
- Click OK
- Import the file
Note: this file can now be opened in Excel and all characters should look correct (as long as Tab is the delimiter).
Numbers (Tested in ver 5.3)
- Open the file
- Modify the foreign text to the correct format
- Click File>>Export to>>CSV
- Under Text Encoding select Unicode (UTF-16)
- Click Next
- Click Export
Note: this file will not open correctly in Excel as it is separated by commas and not tabs. You can still use Excel and import data from text file, the characters will still display correctly.
How to save csv files in the correct format
When opening a file in Excel, it would generally open it in GENERAL format, which changes the format of long numbers to a truncated 15 digit number in scientific notation and also drops the leading zeroes.
Eg. A number like 01234567890123456789 will be changed to 1.23457E+18
Once it is in this format, you CANNOT format it to make it display the numbers correctly no matter what. So, the important thing is to open the file in the correct format via the Import Wizard, to ensure that numbers, which would not be used in calculations, would be formatted to TEXT (Eg. ID numbers, VAT numbers, Postal codes).
Don’t just open the file by double clicking on it, which would open it by default in Excel, but bypassing the Import Wizard.
Don’t open the file from the Download shortcut options, which appear at the bottom of the screen, after downloading a file.
So the VERY simple solution is…
First open Excel (as a blank document) and then from the Data Tab, select ‘From Text’ and browse to the file to be imported. On selecting ‘Import’ the Import Wizard will be initiated.
To enable the legacy text import wizard in the new Excel 2016 to Excel 365 refer to Enable Excel Legacy Text Import Wizard
From the Import Wizard on Step 1, ensure the “Delimited” option is selected and click Next.

On Step 2, select the option for Comma delimited and click Next.

On step 3, select the columns that contain numbers, that should be saved in Text format (eg. ID numbers, VAT numbers) and select the Text format for the column data format.

Click Finish.
When done editing the file, Save the file as .csv type, before importing the file.
Which file extensions can be uploaded?
For security purposes the file types that can be uploaded is limited to: txt, text, csv, tiff, tif, png, gif, jpg, jpe, jpeg, zip, pdf, xls, xlt, xlsx
If you try and upload another type, you will receive this message: ‘You can only upload: txt, text, csv, tiff, tif, png, gif, jpg, jpe, jpeg, zip, pdf, xls, xlt, xlsx.’
Instructions
Statuses on Instructions
General
New: Complete instruction details, and can still make changes
Submitted: Selections in status ‘new’ is set, to make further changes the instruction can be rejected, which results in a status similar to new and further changes can be made
Authorised: The instruction has been approved and can start to proceed. An authorised instruction can be cancelled if processing has not started on the instruction.
Processing: The instruction has started with the dealing process (for instance money transfer has been created or dealer instruction created)
Completed: The instruction has completed and all actions required performed.
Withdrawal
Waiting for tax (if tax should be applied to the withdrawal): Before the tax has been updated
Waiting for payment: Withdrawal is ready to be paid out
Debit orders
When the first debit order (recurring investment) has been authorised, the system will create the next recurring in the status ‘Ready to recure (auto recur), which makes it unnecessary to authorise the next debit order which will proceed on the commencement date.
This state is similar to submitted and the instruction can be rejected to make changes to it, which will require the instruction to be authorised again after it has been rejected.
An auto recur debit order status changes to Authorised when the debit order batch has been created for the debit order (then the next auto recur debit order is created). When the debit order has been matched the status changes to Buying and after the buys have been completed to status Completed.
When to use what instruction?
- Once-off Investment: Deposit made by the client once-off, or we can collect the money from his account
- Recurring Investment: Debit orders from the client’s account
- Unit Transfer In: No cashflow, the units are transferred from another provider/platform/retirement fund to your Nominee. The key here is that you need to have the same instrument/fund on your platform. Depending on the product this is sub categorised as either a Section X transfer, ROT, Share Transfer etc
- Unit Transfer Out: Same as unit transfer in, but the other way around, units are moved off your platform with no cashflow
- Cash Transfer In: Clients want to move his investment from another platform/retirement fund, but you DON’T have the same underlying instruments on your platform. The other platform then pays you cash, and you invest it again into the market. Important: use this if the money does not come from the client. It works the same as a Once-off Investment accept the system records the entity where the money comes from + does not recognise the money in the tax reporting as extra contributions e.g in the case of an RA
- Cash Transfer Out: We don’t have this, since there is no difference currently in the tax reporting. So we use normal Withdrawal and you can use a sub “Purpose” for your reporting to differentiate between withdrawals paid to the client and those paid to other providers as a cash transfer out.
Investments
How do I change the name of an investment?
The name of an investment defaults to the name of the product, but can be changed to a more unique name, especially if the investor has more than one investment in the same product.
1. Select “View Details” from the investment’s Investor Account Card.

2. Overwrite the default investment name to the required name and Save.

What does the Compliance override permission allows?
With Compliance licenses only the instruments that the adviser is licensed to sell AND that are available on the product (under available instruments) are selectable when you choose the fund selection on an investment instruction.
If you override this permission on the user, he/she can select all instruments on the product for any investor account even if the adviser CANNOT sell them. i.e even if the instrument is not in the adviser’s available instrument list.
To locate the “Compliance override” permission, select the “Global Permissions” link from the user’s profile.


The permission “Compliance Override” is there to allow a backend administrator to override the fund selection on an instruction where the account has an adviser.
e.g. The adviser is not licensed for a instrument or there are outstanding compliance documents, but the investor insists that he wants to invest in a certain instrument. The adviser is then not allowed to load an instruction with a specific instrument, but the administrator can if he has the needed signed documents from the client.
Available instruments on Product X: A, B, C
Available instruments on Brokerage Z: A, D, E
Available instruments on Adviser Y: A, D
Compliance Override = Unticked: If a user (including an adviser or administrators) logs in he will only be able to submit an instruction with instrument A
Compliance Override = Ticked: If a user (including an adviser or administrators) logs in he will only be able to submit an instruction with instrument A, B, C
IRR calculations
How do historical transactions impact IRR calculations?
Historical transactions are transactions that did not originate within the system. These are transactions that were imported from another system, creating a Take-on or Opening Balance.
Money coming into an investment account and money going out of the investment account should be considered for cash flow events. When a historical transaction type is setup as a cash flow event it will have an impact on IRR calculations
How to set the cash flow event on Historical Transaction Types:

Examples of cash flow transactions:
[check_list]
- Investment
- Withdrawal
- Transfer In
- Transfer out
[/check_list]
Examples of transactions that are typically not cash flow events:
[check_list]
- Administration fees
- Commission
- Dividends
- Interest
- Adjustments
[/check_list]
Process
Why is the “Authorise Instruction” option not available?
One or more of the following reasons could be stopping the user from authorising an instruction or group contribution:
1. Check on the instruction for validation messages.
This is an example of the message that will be displayed if the linked advisor does not have certain required mandates.

To set the mandates, select “View Details” on the advisor Card of the investor account and check the relevant advisor mandates.

2. On Withdrawals, ensure that the bank account linked on the instruction has been verified.


Reports
What are the figures on the Trustee Report for?
AVERAGE CONTRIBUTIONS PER MEMBER:
The average columns for the “From” and the “To” date uses the same criteria to decide which instructions to include for the calculation of the average.
The criteria is:
-
- The instruction should be any kind of investment (this includes once-offs, cash transfer ins, recurrings etc.)
- The investment should be in a new, rejected or in progress state
- The investment should be the investment created closest (but before) the date specified in the column heading.
NUMBER OF EMPLOYERS:
includes active employers for which the activation date is on or before the column’s date.
TOTAL NUMBER OF MEMBERS:
includes active members for which the activation date is on or before the column’s date (note that a member can be active, without having any instruction yet).
TOTAL VALUE OF EMPLOYERS CONTRIBUTIONS:
for each group go through all active and new members and get the last new or in progress instruction on (or before) the date in the column. Get the amount of this instruction and total all the amounts to get the value for one group. Then total all the group values to get the “Total value of employers contributions”
TOTAL ASSETS UNDER MANAGEMENT:
For each group get the total the amounts of all instructions in the group retirement annuity product (including transfers) invested in the date range starting from inception and ending at the date specified in the column.
Sorting
How do I sort on columns?
Most of the tables in the system allow for sorting by columns. When you hover with the cursor over a column header and it becomes underlined, it is an indication that the column can be sorted on. Then click on the column header to sort ascending and click again to sort in descending order on that column.
For example, the list of investor accounts are sorted by name (ascending by default). By clicking on another column’s header, the list will be sorted according to that column. In the attached example, the “Investment Value” column was selected twice, to sort with the biggest values on top.

Statements
How do I add statement balances to an instrument?
You can have multiple sub-accounts (supplier accounts) in the same fund, in other words different products can invest in the same fund or instrument. The Recon report summarises all the sub-accounts per instrument.
To add Statement balances (Dealer units) to the Recon, you need to add it at the Supplier account level. Go to the bottom of the relevant Instrument.


Switches
When do we create an internal switch?
1. If the sell and buy instruments have the same Dealer and Instrument Provider
AND
2. Both the Collective Investment Schemes of the sell and buy instruments have the “Can do an internal switch?” field checked


User management
How do I log in?
You log in by entering your details and clicking the “Sign in” button.

At least 8 characters are required for a password, containing
- At least 1 number (e.g. 0, 1, 2, 3, …)
- At least 1 capital letter (e.g. H)
- At least 1 small letter (e.g. h)
- At least 1 special character (e.g. #, @, …)
Withdrawals
Where can I see Recurring Withdrawals?
Recurring Withdrawals are listed under Bulk Processes -> Recurring Withdrawals
“Future” withdrawals can be seen in the list, by changing the “To date” to the future date.
As soon as the “Commencement date” on the Withdrawal becomes due ( <= current date), then it will be included in the batch of Dealer Instructions that can be created:
Bulk Processes -> Dealer Instructions -> “Create Dealer Instructions” button.
Bulk Processes -> Dealer Instructions -> “Create Dealer Instructions” button.
What is “Pay per fund when the fund settles” on a withdrawal?
There is a setting on a Product: “Allow – Pay per fund when the fund settles”

When this setting is ticked, a withdrawal instruction on an investor account in the product will display the option to select ‘Pay per fund when the fund settles’ or ‘Pay when all funds settle’.

If ‘Pay per fund when the fund settles’ is selected, you will be allowed to do multiple payments on the withdrawal when each fund settles the sell.
For example, if the investor sells Fund A and Fund B and the money for the sell of Fund A is received, it will be paid out to the investor before the money for the sell of Fund B is received.
If ‘Pay when all funds settle’ is selected, the system will wait for all the cash for the withdrawal to be available and then do one payment to the investor.